
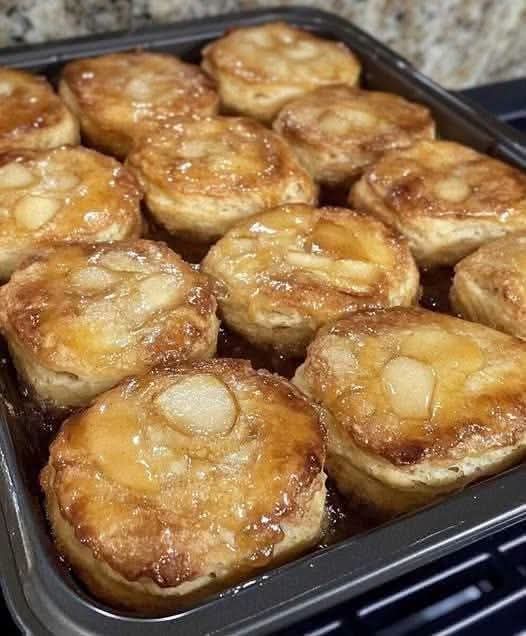
Apple Pie Biscuits
Apple Pie Biscuits combine the warmly spiced flavor of homemade apple pie with the tender, flaky texture of buttermilk biscuits. Small pieces of apple are cooked with butter and brown sugar before being folded gently into the biscuit dough.
These golden biscuits make a comforting fall breakfast, an easy brunch recipe, or a simple dessert served with coffee or tea. They are especially delicious when warm, while the buttery layers are tender and the caramelized apple pieces remain soft and fragrant.
The recipe uses affordable baking ingredients and does not require specialized kitchen equipment. It is a practical choice for weekend baking, holiday breakfasts, family gatherings, or make-ahead meal planning.
Recipe Overview
| Recipe Detail | Information |
|---|---|
| Preparation time | 25 minutes |
| Cooking time | 12–15 minutes |
| Cooling time | 5 minutes |
| Total time | 42–45 minutes |
| Servings | 8 |
| Yield | Approximately 8 biscuits |
| Cooking method | Oven-baked |
| Oven temperature | 425°F (220°C) |
| Difficulty | Easy to moderate |
| Best served | Warm |
| Course | Breakfast, brunch, snack, or dessert |
Why You’ll Love This Recipe
These biscuits offer two classic baked treats in one recipe. Every bite combines tender apples, warm cinnamon, subtle nutmeg, and buttery biscuit layers.
The apple filling is cooked before it enters the dough. This concentrates its flavor, softens the fruit, and prevents raw apple pieces from releasing too much liquid while the biscuits bake.
The recipe uses familiar, budget-friendly groceries that are easy to find. It is a useful addition to a weekly meal plan when you want a homemade breakfast without purchasing expensive prepared pastries.
No electric mixer is necessary. A mixing bowl, skillet, pastry cutter, and baking sheet are the primary kitchen tools required.
The biscuits can also be prepared in advance and frozen, making them a convenient option for busy mornings, holiday brunches, and seasonal entertaining.
Ingredients
For the Caramelized Apples
| Ingredient | Measurement | Purpose |
|---|---|---|
| Apple, peeled and finely chopped | ½ cup | Adds fresh apple flavor and texture |
| Light or dark brown sugar | ¼ cup | Sweetens and caramelizes the apples |
| Unsalted butter | 1 tablespoon | Adds richness to the filling |
For the Biscuit Dough
| Ingredient | Measurement | Purpose |
|---|---|---|
| All-purpose flour | 2 cups | Provides structure |
| Baking powder | 2½ teaspoons | Helps the biscuits rise |
| Ground cinnamon | 1 teaspoon | Adds warm apple-pie flavor |
| Ground nutmeg | ¼ teaspoon | Adds depth and warmth |
| Salt | ¼ teaspoon | Balances the sweetness |
| Cold unsalted butter, cubed | ¼ cup | Creates tender, flaky layers |
| Cold buttermilk | ½ cup, plus more if needed | Moistens and tenderizes the dough |
| Milk | 1 tablespoon | Helps the tops become golden |
Step-by-Step Instructions
Step 1: Prepare the Apple Filling
Peel the apple and cut it into small, even pieces. Keeping the pieces small helps them blend into the dough without tearing the biscuits apart.
Melt one tablespoon of butter in a small skillet over medium heat.
Add the chopped apple and brown sugar. Cook for 5–7 minutes, stirring occasionally, until the apple is tender and coated in a thick, glossy syrup.
Transfer the filling to a plate or shallow bowl. Let it cool completely before adding it to the biscuit dough. Warm filling could soften the cold butter and reduce the biscuits’ flakiness.
Step 2: Preheat the Oven
Preheat the oven to 425°F (220°C).
Line a baking sheet with parchment paper or a silicone baking mat. This prevents sticking and makes cleanup easier.
Step 3: Combine the Dry Ingredients
Place the all-purpose flour, baking powder, cinnamon, nutmeg, and salt in a large mixing bowl.
Whisk until the spices and baking powder are distributed evenly throughout the flour.
Step 4: Cut in the Cold Butter
Add the cold, cubed butter to the flour mixture.
Use a pastry cutter, two forks, or your fingertips to work the butter into the flour. Stop when the mixture resembles coarse crumbs with some pea-sized pieces of butter remaining.
Those visible pieces of cold butter release steam in the oven, helping create tender layers.
Step 5: Add the Buttermilk
Pour ½ cup of cold buttermilk into the bowl.
Stir gently until the mixture begins forming a rough dough. Do not continue mixing once most of the dry flour has been incorporated.
If the dough remains very dry and will not hold together, add extra buttermilk one tablespoon at a time. The dough should be slightly tacky but not wet.
Step 6: Fold in the Apples
Add the completely cooled apple mixture to the dough.
Fold gently just until the apples are distributed. Avoid vigorous stirring because overworking the flour can produce dense or tough biscuits.
Step 7: Shape and Fold the Dough
Lightly flour a clean work surface and transfer the dough onto it.
Use your hands to bring the dough together, then gently pat it into a rectangle approximately ½ inch thick.
Fold the rectangle into thirds like a letter. This simple folding technique creates additional layers without requiring complicated pastry work.
Pat the folded dough into another rectangle approximately ¾ inch thick. Avoid pressing it too thin if you prefer tall biscuits.
Step 8: Cut the Biscuits
Use a floured round biscuit cutter to cut the dough.
Press the cutter straight down and lift it directly upward. Twisting the cutter can seal the edges and prevent the biscuits from rising evenly.
Gently bring the remaining scraps together and cut additional biscuits. Handle the scraps as little as possible because repeatedly working the dough can make the final biscuits firmer.
Step 9: Brush With Milk
Arrange the biscuits on the prepared baking sheet.
Brush the tops lightly with milk. Avoid allowing too much milk to run down the sides because it may interfere with the layered rise.
For softer sides, position the biscuits close together. For crispier edges, leave approximately two inches between them.
Step 10: Bake
Bake for 12–15 minutes, or until the biscuits have risen and the tops are golden brown.
Begin checking after 12 minutes because baking time can vary according to biscuit thickness, baking-sheet material, and oven accuracy.
Step 11: Cool and Serve
Transfer the baked biscuits to a wire rack and let them cool for approximately five minutes.
Serve them warm on their own or add butter, apple preserves, honey, or a light vanilla glaze.
Best Tips
Keep the butter and buttermilk cold until you are ready to use them. Cold ingredients are essential for creating flaky biscuit layers.
Cool the apple filling completely before folding it into the dough. Warm apples can melt the butter prematurely and make the dough sticky.
Cut the apple into small pieces. Large chunks can create wet pockets, interfere with the biscuits’ structure, and make clean cutting more difficult.
Mix and fold the dough gently. The goal is to combine the ingredients without developing too much gluten.
Add extra buttermilk cautiously. Flour absorbs liquid differently depending on the brand, storage conditions, and humidity, so the dough may need one or two additional tablespoons.
Use an oven thermometer if your baked goods regularly brown too quickly or require much longer than expected. Accurate oven temperature is one of the most important factors in successful home baking.
Best Ingredient Options
Firm baking apples such as Granny Smith, Honeycrisp, Braeburn, or Pink Lady work especially well. Granny Smith provides a tart contrast to the brown sugar, while Honeycrisp creates a naturally sweeter filling.
Fresh baking powder provides the most dependable rise. If the container has been open for a long time, test a small amount in hot water. It should bubble immediately.
Full-fat buttermilk produces tender biscuits with a rich flavor. If buttermilk is unavailable, combine ½ cup of regular milk with 1½ teaspoons of lemon juice or white vinegar and let it rest for five minutes.
Unsalted butter allows you to control the salt level. European-style butter can provide a richer flavor, although ordinary supermarket butter works perfectly well.
Light brown sugar creates a mild caramel flavor. Dark brown sugar contains more molasses and gives the apple filling a deeper color and stronger taste.
Recipe Variations
For Apple Pecan Biscuits, fold ¼ cup of finely chopped pecans into the dough with the cooled apples. Walnuts may be used in the same quantity.
For glazed biscuits, combine ½ cup of powdered sugar with one or two teaspoons of milk and a small splash of vanilla extract. Drizzle the glaze over biscuits that have cooled for at least 10 minutes.
For a stronger apple-pie flavor, add a small pinch of ground ginger, cloves, or allspice. Use these powerful spices sparingly so they do not overwhelm the apple.
For Pear Pie Biscuits, replace the apple with an equal quantity of firm, finely diced pear. Cook it until tender but not watery.
For a sweet and savory variation, add ⅓ cup of finely shredded sharp cheddar cheese. Apple and cheddar create a classic combination that works particularly well for brunch.
For cinnamon-sugar tops, combine one tablespoon of granulated sugar with ¼ teaspoon of cinnamon. Sprinkle it over the milk-brushed biscuits immediately before baking.
What to Serve With
Serve these biscuits with hot coffee, tea, or warm apple cider for a relaxed fall breakfast or afternoon snack.
For a complete brunch menu, pair them with scrambled eggs, bacon, breakfast sausage, or a vegetable omelet. Fresh berries or a simple fruit salad add a refreshing contrast.
For dessert, serve the biscuits warm with vanilla ice cream, whipped cream, caramel sauce, or additional sautéed apples.
They are also delicious with salted butter, apple butter, cream cheese, maple syrup, honey, or cinnamon-flavored yogurt.
Make-Ahead Instructions
The apple filling can be prepared up to two days in advance. Store it in a covered container in the refrigerator and keep it cold until you are ready to assemble the dough.
The unbaked biscuits can be cut and refrigerated on a covered baking sheet for up to 12 hours. Brush them with milk immediately before baking.
You may need to add one or two minutes to the baking time when the biscuits go directly from the refrigerator into the oven.
Storage
Allow the biscuits to cool completely before placing them in an airtight container.
Store them at room temperature for up to two days. Place a sheet of paper towel inside the container to absorb excess moisture.
For longer storage, refrigerate the biscuits for up to four days. Refrigeration can make biscuits firmer, so reheating is recommended before serving.
Reheating
Reheat the biscuits in a 350°F (175°C) oven for 5–8 minutes. Loosely wrapping them in foil will keep them softer, while heating them uncovered will produce a slightly crisper exterior.
An air fryer can reheat the biscuits at 320°F (160°C) for approximately 3–4 minutes.
For a quick option, microwave one biscuit for 10–15 seconds. Microwave heating softens the exterior, so it will not restore the original crispness.
Freezing
Allow baked biscuits to cool completely before freezing them.
Arrange them in a single layer on a tray and freeze until firm. Transfer them to a freezer-safe container or resealable bag and keep them frozen for up to two months.
Reheat frozen baked biscuits in a 350°F (175°C) oven for approximately 10–15 minutes.
Unbaked biscuits can also be frozen after cutting. Freeze them on a tray before transferring them to a freezer-safe container. Bake directly from frozen at 425°F (220°C), adding approximately 3–5 minutes to the normal baking time.
Common Mistakes to Avoid
Adding warm apple filling to the dough can melt the butter and prevent flaky layers from forming. Give the filling enough time to cool completely.
Overmixing the dough develops excess gluten and creates tough biscuits. Stop stirring as soon as the dough begins holding together.
Using too much buttermilk produces a wet, difficult-to-shape dough. Add extra liquid gradually and only when dry flour remains at the bottom of the bowl.
Allowing the chopped apples to remain watery can affect the dough’s consistency. Cook the filling until the liquid becomes thick and syrupy rather than thin.
Twisting the biscuit cutter can seal the dough’s edges. Press straight down and lift straight up to encourage an even rise.
Using warm butter reduces flakiness. If the dough becomes noticeably soft while you work, refrigerate it for 10–15 minutes before cutting the biscuits.
Overbaking dries out the centers. Remove the biscuits once the tops are golden and the sides appear set.
Nutrition Estimate
| Nutrient | Estimated Amount per Biscuit |
|---|---|
| Calories | 220 kcal |
| Carbohydrates | 32 g |
| Protein | 4 g |
| Total fat | 9 g |
| Saturated fat | 6 g |
| Fiber | 1 g |
| Sugar | 9 g |
| Sodium | 250 mg |
Nutrition information is an estimate based on eight biscuits. Actual values will vary according to the apple variety, buttermilk, butter, biscuit size, and optional toppings.
Frequently Asked Questions
Which apples are best for Apple Pie Biscuits?
Firm apples that maintain their structure during cooking work best. Granny Smith, Honeycrisp, Braeburn, and Pink Lady are dependable choices.
Can I use canned apple pie filling?
Yes, but it should be finely chopped and used sparingly because canned filling contains more liquid and sugar. Approximately ½ cup is enough for this recipe.
Why didn’t my biscuits rise?
Old baking powder, warm butter, overmixed dough, or twisting the biscuit cutter can prevent a proper rise. Confirm that the baking powder is active and keep all dairy ingredients cold.
Can I prepare the dough without buttermilk?
Yes. Mix ½ cup of milk with 1½ teaspoons of lemon juice or white vinegar. Let it rest for five minutes before using it as a homemade buttermilk substitute.
Why is my dough sticky?
The apple filling may contain excess liquid, or too much buttermilk may have been added. Lightly flour your hands and work surface, but avoid adding a large amount of flour because it can make the biscuits dry.
Can I use self-rising flour?
Yes. Replace the all-purpose flour, baking powder, and salt with two cups of self-rising flour. Keep the cinnamon and nutmeg unchanged.
Can these biscuits be made in an air fryer?
Yes. Arrange a small batch in a parchment-lined air-fryer basket with space between each biscuit. Cook at 350°F (175°C) for approximately 9–12 minutes, checking for doneness early.
How do I know when the biscuits are fully baked?
The tops should be golden brown, the sides should look set, and the interior should no longer appear wet or doughy. If necessary, open one biscuit from the center of the tray to check.
Final Thoughts
Apple Pie Biscuits bring together caramelized apples, warm spices, and flaky buttermilk dough in one comforting homemade recipe.
They are affordable enough for everyday baking yet special enough for a holiday breakfast or fall brunch. The dough can be prepared ahead, and the finished biscuits store and freeze well, making them useful for meal prep and busy mornings.
Serve them fresh from the oven for the best texture, with a little butter or a sweet vanilla glaze. Each warm biscuit delivers the familiar flavor of apple pie in a simple, handheld treat.